The Cisco IOS provides thousands of commands, and configuring it can be challenging. Here are 10 commands you need to know, inside and out, when using the Cisco IOS.
#1: The “?”
It may seem entirely too obvious that you should know how to type ? to ask for help when using the Cisco IOS. However, the Cisco IOS is completely different from other operating systems when it comes to using the question mark (help key). As the IOS is a command-line operating system with thousands of possible commands and parameters, using the ? can save your day.
You can use the command in many ways. First, use it when you don’t know what command to type. For example, type ? at the command line for a list of all possible commands. You can also use ? when you don’t know what a command’s next parameter should be. For example, you might type show ip ? If the router requires no other parameters for the command, the router will offer CR as the only option. Finally, use ? to see all commands that start with a particular letter. For example, show c? will return a list of commands that start with the letter c.
#2: show running-configuration
The show running-config command shows the router, switch, or firewall’s current configuration. The running-configuration is the config that is in the router’s memory. You change this config when you make changes to the router. Keep in mind that config is not saved until you do a copy running-configuration startup-configuration. This command can be abbreviated sh run.
#3: copy running-configuration startup-configuration
This command will save the configuration that is currently being modified (in RAM), also known as the running-configuration, to the nonvolatile RAM (NVRAM). If the power is lost, the NVRAM will preserve this configuration. In other words, if you edit the router’s configuration, don’t use this command and reboot the router–those changes will be lost. This command can be abbreviated copy run start. The copy command can also be used to copy the running or startup configuration from the router to a TFTP server in case something happens to the router.
#4: show interface
The show interface command displays the status of the router’s interfaces. Among other things, this output provides the following:
* Interface status (up/down)
* Protocol status on the interface
* Utilization
* Errors
* MTU
This command is essential for troubleshooting a router or switch. It can also be used by specifying a certain interface, like shint fa0/0.
#5: show ip interface
Even more popular than show interface are show ip interface and show ip interface brief. The show ip interface command provides tons of useful information about the configuration and status of the IP protocol and its services, on all interfaces. The show ip interface brief command provides a quick status of the interfaces on the router, including their IP address, Layer 2 status, and Layer 3 status.
#6: config terminal, enable, interface, and router
Cisco routers have different modes where only certain things can be shown or certain things can be changed. Being able to move between these modes is critical to successfully configuring the router.
For example, when logging in, you start off at the user mode (where the prompt looks like >). From there, you type enable to move to privileged mode (where the prompt looks like #). In privileged mode, you can show anything but not make changes. Next, type config terminal (or config t) to go to global configuration mode (where the prompt looks like router(config)# ). From here, you can change global parameters. To change a parameter on an interface (like the IP address), go to interface configuration mode with the interface command (where the prompt looks like router(config-if)#). Also from the global configuration mode, you can go into router configuration using the router {protocol} command. To exit from a mode, type exit.
#7: no shutdown
The no shutdown command enables an interface (brings it up). This command must be used in interface configuration mode. It is useful for new interfaces and for troubleshooting. When you’re having trouble with an interface, you may want to try a shut and no shut. Of course, to bring the interface down, reverse the command and just say shutdown. This command can be abbreviated no shut.
#8: show ip route
The show ip route command is used to show the router’s routing table. This is the list of all networks that the router can reach, their metric (the router’s preference for them), and how to get there. This command can be abbreviated shipro and can have parameters after it, like shiproospf for all OSPF routers. To clear the routing table of all routes, you do clear ip route *. To clear it of just one route, do clear ip route 1.1.1.1 for clearing out that particular network.
#9: show version
The show version command gives you the router’s configuration register (essentially, the router’s firmware settings for booting up), the last time the router was booted, the version of the IOS, the name of the IOS file, the model of the router, and the router’s amount of RAM and Flash. This command can be abbreviated shver.
#10: debug
The debug command has many options and does not work by itself. It provides detailed debugging output on a certain application, protocol, or service. For example, debug ip route will tell you every time a router is added to or removed from the router.
Thursday, October 9, 2008

Mitigate problems using Cisco IOS debug
Ideally, all of your Cisco router configurations run like clockwork and you rarely need to troubleshoot them. That's the way it should be, since these devices usually work as the pillars of network connectivity within an organization. But if your Cisco routers do have problems, you need to be able to come to a resolution quickly and effectively. That's why we're going to look at how to use the Cisco IOS debug commands.
This article is intended for the intermediate level network administrator who has never encountered circumstances that would require debugging the Cisco IOS. But if you've used debug before, perhaps this article will give you some suggestions for ways to use debug that you haven't previously tried.
Key points
Before I introduce 10 ways to use Cisco IOS debug, here are a few tips and caveats:
Now let’s move on and look at 10 ways to use Cisco IOS debug. We'll start with number 10 and work our way up to the most useful debug command.
10. Debug all
By far, the most dangerous debug command is debug all. This command will most likely crash a production router. The Cisco IOS is nice enough to ask, “Are you sure?” before doing it. Only use this command if you are desperate, you know you are on a test router, and/or you are having trouble isolating the proper subcommand to debug. To satisfy your curiosity of what it looks like to run it, Listing C shows the output from executing the command and then issuing show debug to see what it turned on.
9. Debug with ISDN and dialer
Debugging is helpful when troubleshooting Cisco router dialup configurations. In my experience, these technologies rarely seem to work the first time. The best way to configure IOS dialup technologies (or any networking technologies) is layer by layer, testing each layer after configuring it. I try to think of a multilayer cake, where the icing is the successful testing of each OSI layer after each configuration. When something doesn’t work, debug is usually a must. Useful debug commands for ISDN and dialup networking appear below:
00:18:52: BRI0/0 DDR: Attempting to dial 8358661
00:19:22: BRI0/0:2 DDR: disconnecting call
This can be especially helpful if you have a router that keeps calling when you don't want it to.
· debug dialer packet will tell you what packets are doing across your dialer interfaces, where they are going to and coming from, and whether they were permitted (as interesting traffic) or denied (as uninteresting traffic) by the dialer-list configured on that interface. Here's some sample output of permitted and denied packets: 00:39:24: BRI0/0 DDR: ip (s=1.1.1.2, d=1.1.1.1), 100 bytes, outgoing interesting (ip PERMIT)
00:39:24: BRI0/0 DDR: ip (s=1.1.1.2, d=1.1.1.1), 100 bytes, outgoing interesting (ip PERMIT)
00:39:24: BRI0/0 DDR: ip (s=1.1.1.2, d=1.1.1.1), 100 bytes, outgoing interesting (ip PERMIT)
00:39:24: BRI0/0 DDR: ip (s=1.1.1.2, d=1.1.1.1), 100 bytes, outgoing interesting (ip PERMIT)
00:41:09: BRI0/0 DDR: cdp, 273 bytes, outgoing uninteresting (no list matched)
8. PPP authentication
If you configured PPP authentication on your dialup lines (which you should, for security reasons), you could end up with username/password mismatches on each side. Finding out that this is the reason that the line won’t come up can be impossible without using debug ppp authentication.
Here's some sample output of missing username/password information on one router:
00:32:30: BR0/0:1 CHAP: O CHALLENGE id 13 len 23 from "r2"
00:32:31: BR0/0:1 CHAP: I CHALLENGE id 2 len 23 from "r1"
00:32:31: BR0/0:1 CHAP: O RESPONSE id 2 len 23 from "r2"
00:32:31: BR0/0:1 CHAP: I FAILURE id 2 len 26 msg is "Authentication failure"
This is sample output of an incorrect password on one router:
00:47:05: BR0/0:1 CHAP: O CHALLENGE id 25 len 23 from "r2"
00:47:05: BR0/0:1 CHAP: I CHALLENGE id 19 len 23 from "r1"
00:47:05: BR0/0:1 CHAP: O RESPONSE id 19 len 23 from "r2"
00:47:05: BR0/0:1 CHAP: I FAILURE id 19 len 25 msg is "MD/DES compare failed"
7. Debug {topology} packet
As I mentioned above, it is best to troubleshoot networking technologies using a layered approach, working your way up the OSI model from Layer 1. (I give credit to Bruce Caslow and his book Cisco Certification: Bridges, Routers, and Switches for CCIEs for carefully documenting this approach.)
Using that model, for whatever network topology you are working with, you can use the debug command to see that your Layer 2 packets are being encapsulated properly. (Of course, I'm assuming that all the cables are connected at Layer 1.) For instance, let's say that you work with frame-relay and you're having trouble getting packets across a link. You've verified that the link is up, but there is still no data passing on it. You could try
debug frame-relay packet
Then, you could attempt to ping the interface on the remote router. If the ping passes, you will get the following:
01:03:22: Serial0/0:Encaps failed--no map entry link 7(IP)
This tells you that encapsulation failed for the IP packet into the frame-relay protocol. It even tells you that it failed because there is no frame-relay map statement. If you fix that and try it again, you might find that you get no frame-relay errors. But then the packet still may not pass. Thus, you'll need to go up to Layer 3 and try:
debug ip packet
You might get this output:
01:06:46: IP: s=1.1.1.2 (local), d=11.11.11.11, len 100, unroutable
This tells you that there is no IP route for your packet to traverse. Thus, you know you need to add a route.
You can insert whatever networking topology you are working with on the debug {topology} line. Some other possibilities are:
6. Debug crypto (IPSec and VPN features)
I won’t go into a lot of detail and examples here since IPSec and VPN are huge topics that can get very complex. But I do want to point out that you can troubleshoot IPSec connections with debugging commands. Because of the popularity of VPN and IPSec, it is important to know how to use debug commands for these technologies. Some of the possibilities are:
In addition, debug ip packet, as mentioned below, is useful in troubleshooting IPsec connections.
If you want to learn more on this topic, I recommend going to Cisco’s IP Security Protocols Section, choosing the protocol you are interested in (IPSec, IKE, etc.), and looking at the different configurations along with their recommended troubleshooting methods.
5. Debug IP routing
Using debug with IP routing protocols can be useful as well. For example, to know if you have a route flapping (a route being added and removed frequently), you can use debug ip routing.
If you had a flapping route, you might see something like:
01:30:56: RT: add 111.111.111.111/32 via 12.12.12.11, ospf metric [110/65]
01:31:13: RT: del 111.111.111.111/32 via 12.12.12.11, ospf metric [110/65]
01:31:13: RT: delete subnet route to 111.111.111.111/32
01:31:13: RT: delete network route to 111.0.0.0
01:32:56: RT: add 111.111.111.111/32 via 12.12.12.11, ospf metric [110/65]
01:33:13: RT: del 111.111.111.111/32 via 12.12.12.11, ospf metric [110/65]
01:33:13: RT: delete subnet route to 111.111.111.111/32
01:33:13: RT: delete network route to 111.0.0.0
This could indicate a routing loop in your network. On the other hand, it could indicate a link going up and down, perhaps a bouncing dialup interface or frame-relay interface.
4. Debug ip {routing protocol}
You can insert many options with debug ip. Issuing the debug ip ? command will display them. We've included the options in Listing D.
Most routing protocols (e.g., OSPF, EIGRP, IGRP, and BGP) are included in this list. Each has its own extensive options that can be debugged. (You can see all the options for a particular protocol by issuing the debug ip {routing protocol} ? command.) For instance, the only way to know that your two OSPF routers are not forming an adjacency due to mismatched authentication types is to issue debug ip ospf adjacency.
You might see the following output, telling you that the authentication types are mismatched:
01:39:46: OSPF: Rcv pkt from 12.12.12.11, Serial0/0 : Mismatch Authentication type. Input packet specified type 0, we use type 2
In this case, if it weren't for debug, you could be scratching your head for a while.
3. Debug list
An interesting debug command that isn’t widely known is debug list. This command doesn’t actually debug anything. Instead, it sets an interface and/or access list for the next debug you enter. So if you are going to issue some command that you know will produce a lot of output but that doesn’t have an option to limit that output with an access command, you can first issue the debug list XXX command (where XXX is an access list number you have already created) and then run the command you want to debug on. An example would be:
debug list 1
debug dhcp detail
DHCP client activity debugging is on for access list: 1 (detailed)
2. Log an access list to system or syslog
You can use the log option at the end of an access list to log packets that are permitted or denied. This could enable you to log packets that are denied on a router being used as a firewall or to control access at an important network point. Remember that a firewall doesn’t have to just protect you from the Internet; it can protect higher security departments (such as accounting), be placed between two business partners, or just keep some traffic (like P2P traffic) off your network. While this isn’t technically a debug command, it can certainly be used for debugging and troubleshooting. Let's look at a couple of examples.
First, suppose that you want to allow only BGP traffic in your network and keep track of all other traffic that attempts to enter a link. Here's a sample configuration:
Interface Serial 0/0
Access-group 100 in
access-list 100 remark Begin -- Allow BGP IN and OUT
access-list 100 permit tcp host 1.1.1.1 host 2.2.2.2 eq bgp
access-list 100 permit udp any host 2.2.2.2 gt 33000
access-list 100 remark End
access-list 100 deny ip any any log
All traffic will go to your Cisco router’s log if you have “logging buffered” turned on or to a syslog server if you configured one.
For the second example, let's say you are trying to nail down an access list to permit only the proper traffic to go over your dialup link. You use an access list and log the existing traffic to get an idea of what is being carried so that you can configure the correct access list. Here's a sample configuration:
Interface BRI 0/0
Access-group 100 in
Access-group 100 out
access-list 100 permit ip any any log
If you look at the output in the router’s log, you will see that an ICMP packet and a TCP packet went across your link:
02:03:43: %SEC-6-IPACCESSLOGDP: list 100 permitted icmp 1.1.1.2 -> 1.1.1.1 (0/0), 1 packet
02:06:25: %SEC-6-IPACCESSLOGP: list 100 permitted tcp 1.1.1.2(0) -> 1.1.1.1(0), 1 packet
1. Debug IP packet detail XXX (access list number)
My number-one debug technique is using an access list to see all the traffic going to and from some destination, just like a basic sniffer/protocol analyzer. The limitation to this one is that you can’t see the packet payload and can see almost nothing of the headers.
Since you can do this with an access list, you can nail it down to a particular host, protocol, port, or network range, as well as using a uni- or bi-directional access list. I know it isn’t a real protocol analyzer, but it could still come in handy—and it's already built into the IOS. The sample configuration below shows the logging of all Telnet packets to your router. (These could just as well be a host on one of your router’s networks.)
access-list 101 permit tcp any any eq telnet
debug ip packet detail 101
IP packet debugging is on (detailed) for access list 101
Listing Eshows the sample output of what the debug output would look like.
You can see from the output that you get the IP source, destination, interfaces, source and destination port numbers, sequence numbers, acknowledgement numbers, window sizes, and TCP communication flags (SYN, ACK, FIN).
This article is intended for the intermediate level network administrator who has never encountered circumstances that would require debugging the Cisco IOS. But if you've used debug before, perhaps this article will give you some suggestions for ways to use debug that you haven't previously tried.
Key points
Before I introduce 10 ways to use Cisco IOS debug, here are a few tips and caveats:
- · The techniques I'm including are not the only ways to use debug. In fact, there are hundreds of ways to use debug. Listing A: shows all the possible subcommands that can be debugged in IOS 12.2 (the version I was running). You will see that there are more than you would ever want to use. In addition, each subcommand has its own subcommands. I'll be focusing on some of the debug commands I consider most common and useful.
- · Using Cisco IOS debug can be dangerous and should first be used on a test router and then used carefully on a production router. I don’t want anyone to get fired because he crashed the company’s production router after trying debug commands from this article.
- · By default, debug messages will go to the console and will not be sent to any log. To log debug output (or any system output) to the IOS system log, you must turn on logging buffered in global configuration mode. You can see if logging is on by issuing the show logging command on your router. The output looks like Listing B. As you can see, there are three kinds of logging: console, monitor, and buffer. There are also different levels of logging.
- · If you want to see debug output on a terminal (or Telnet session) that is not the console, use the terminal monitor command.
- · You can also set up “conditional debugging” to debug only when certain conditions apply. See Cisco's Troubleshooting and Fault Management to learn more about this.
- · If you turn on some debugging that is filling up your screen, the quickest way to turn it off is by running the un all command. The un is a built-in macro for undebug.
Now let’s move on and look at 10 ways to use Cisco IOS debug. We'll start with number 10 and work our way up to the most useful debug command.
10. Debug all
By far, the most dangerous debug command is debug all. This command will most likely crash a production router. The Cisco IOS is nice enough to ask, “Are you sure?” before doing it. Only use this command if you are desperate, you know you are on a test router, and/or you are having trouble isolating the proper subcommand to debug. To satisfy your curiosity of what it looks like to run it, Listing C shows the output from executing the command and then issuing show debug to see what it turned on.
9. Debug with ISDN and dialer
Debugging is helpful when troubleshooting Cisco router dialup configurations. In my experience, these technologies rarely seem to work the first time. The best way to configure IOS dialup technologies (or any networking technologies) is layer by layer, testing each layer after configuring it. I try to think of a multilayer cake, where the icing is the successful testing of each OSI layer after each configuration. When something doesn’t work, debug is usually a must. Useful debug commands for ISDN and dialup networking appear below:
- · debug isdn events debugs all ISDN events. Start with this one first before trying q921 or q931, as those are very verbose and events may tell you all you need to know.
- · debug isdn q921 is Layer 2.
- · debug isdn q931 is Layer 3.
- · debug dialer events will tell you about the calls (i.e., the reason the call was initiated and/or disconnected). Here is some sample output:
00:18:52: BRI0/0 DDR: Attempting to dial 8358661
00:19:22: BRI0/0:2 DDR: disconnecting call
This can be especially helpful if you have a router that keeps calling when you don't want it to.
00:39:24: BRI0/0 DDR: ip (s=1.1.1.2, d=1.1.1.1), 100 bytes, outgoing interesting (ip PERMIT)
00:39:24: BRI0/0 DDR: ip (s=1.1.1.2, d=1.1.1.1), 100 bytes, outgoing interesting (ip PERMIT)
00:39:24: BRI0/0 DDR: ip (s=1.1.1.2, d=1.1.1.1), 100 bytes, outgoing interesting (ip PERMIT)
00:41:09: BRI0/0 DDR: cdp, 273 bytes, outgoing uninteresting (no list matched)
8. PPP authentication
If you configured PPP authentication on your dialup lines (which you should, for security reasons), you could end up with username/password mismatches on each side. Finding out that this is the reason that the line won’t come up can be impossible without using debug ppp authentication.
Here's some sample output of missing username/password information on one router:
00:32:30: BR0/0:1 CHAP: O CHALLENGE id 13 len 23 from "r2"
00:32:31: BR0/0:1 CHAP: I CHALLENGE id 2 len 23 from "r1"
00:32:31: BR0/0:1 CHAP: O RESPONSE id 2 len 23 from "r2"
00:32:31: BR0/0:1 CHAP: I FAILURE id 2 len 26 msg is "Authentication failure"
This is sample output of an incorrect password on one router:
00:47:05: BR0/0:1 CHAP: O CHALLENGE id 25 len 23 from "r2"
00:47:05: BR0/0:1 CHAP: I CHALLENGE id 19 len 23 from "r1"
00:47:05: BR0/0:1 CHAP: O RESPONSE id 19 len 23 from "r2"
00:47:05: BR0/0:1 CHAP: I FAILURE id 19 len 25 msg is "MD/DES compare failed"
7. Debug {topology} packet
As I mentioned above, it is best to troubleshoot networking technologies using a layered approach, working your way up the OSI model from Layer 1. (I give credit to Bruce Caslow and his book Cisco Certification: Bridges, Routers, and Switches for CCIEs for carefully documenting this approach.)
Using that model, for whatever network topology you are working with, you can use the debug command to see that your Layer 2 packets are being encapsulated properly. (Of course, I'm assuming that all the cables are connected at Layer 1.) For instance, let's say that you work with frame-relay and you're having trouble getting packets across a link. You've verified that the link is up, but there is still no data passing on it. You could try
debug frame-relay packet
Then, you could attempt to ping the interface on the remote router. If the ping passes, you will get the following:
01:03:22: Serial0/0:Encaps failed--no map entry link 7(IP)
This tells you that encapsulation failed for the IP packet into the frame-relay protocol. It even tells you that it failed because there is no frame-relay map statement. If you fix that and try it again, you might find that you get no frame-relay errors. But then the packet still may not pass. Thus, you'll need to go up to Layer 3 and try:
debug ip packet
You might get this output:
01:06:46: IP: s=1.1.1.2 (local), d=11.11.11.11, len 100, unroutable
This tells you that there is no IP route for your packet to traverse. Thus, you know you need to add a route.
You can insert whatever networking topology you are working with on the debug {topology} line. Some other possibilities are:
- · debug atm packet
- · debug serial packet
- · debug ppp packet
- · debug dialer packet
- · debug fastethernet packet
6. Debug crypto (IPSec and VPN features)
I won’t go into a lot of detail and examples here since IPSec and VPN are huge topics that can get very complex. But I do want to point out that you can troubleshoot IPSec connections with debugging commands. Because of the popularity of VPN and IPSec, it is important to know how to use debug commands for these technologies. Some of the possibilities are:
- · debug crypto isakmp
- · debug crypto ipsec
- · debug crypto engine
- · debug ip security
- · debug tunnel
In addition, debug ip packet, as mentioned below, is useful in troubleshooting IPsec connections.
If you want to learn more on this topic, I recommend going to Cisco’s IP Security Protocols Section, choosing the protocol you are interested in (IPSec, IKE, etc.), and looking at the different configurations along with their recommended troubleshooting methods.
5. Debug IP routing
Using debug with IP routing protocols can be useful as well. For example, to know if you have a route flapping (a route being added and removed frequently), you can use debug ip routing.
If you had a flapping route, you might see something like:
01:30:56: RT: add 111.111.111.111/32 via 12.12.12.11, ospf metric [110/65]
01:31:13: RT: del 111.111.111.111/32 via 12.12.12.11, ospf metric [110/65]
01:31:13: RT: delete subnet route to 111.111.111.111/32
01:31:13: RT: delete network route to 111.0.0.0
01:32:56: RT: add 111.111.111.111/32 via 12.12.12.11, ospf metric [110/65]
01:33:13: RT: del 111.111.111.111/32 via 12.12.12.11, ospf metric [110/65]
01:33:13: RT: delete subnet route to 111.111.111.111/32
01:33:13: RT: delete network route to 111.0.0.0
This could indicate a routing loop in your network. On the other hand, it could indicate a link going up and down, perhaps a bouncing dialup interface or frame-relay interface.
4. Debug ip {routing protocol}
You can insert many options with debug ip. Issuing the debug ip ? command will display them. We've included the options in Listing D.
Most routing protocols (e.g., OSPF, EIGRP, IGRP, and BGP) are included in this list. Each has its own extensive options that can be debugged. (You can see all the options for a particular protocol by issuing the debug ip {routing protocol} ? command.) For instance, the only way to know that your two OSPF routers are not forming an adjacency due to mismatched authentication types is to issue debug ip ospf adjacency.
You might see the following output, telling you that the authentication types are mismatched:
01:39:46: OSPF: Rcv pkt from 12.12.12.11, Serial0/0 : Mismatch Authentication type. Input packet specified type 0, we use type 2
In this case, if it weren't for debug, you could be scratching your head for a while.
3. Debug list
An interesting debug command that isn’t widely known is debug list. This command doesn’t actually debug anything. Instead, it sets an interface and/or access list for the next debug you enter. So if you are going to issue some command that you know will produce a lot of output but that doesn’t have an option to limit that output with an access command, you can first issue the debug list XXX command (where XXX is an access list number you have already created) and then run the command you want to debug on. An example would be:
debug list 1
debug dhcp detail
DHCP client activity debugging is on for access list: 1 (detailed)
2. Log an access list to system or syslog
You can use the log option at the end of an access list to log packets that are permitted or denied. This could enable you to log packets that are denied on a router being used as a firewall or to control access at an important network point. Remember that a firewall doesn’t have to just protect you from the Internet; it can protect higher security departments (such as accounting), be placed between two business partners, or just keep some traffic (like P2P traffic) off your network. While this isn’t technically a debug command, it can certainly be used for debugging and troubleshooting. Let's look at a couple of examples.
First, suppose that you want to allow only BGP traffic in your network and keep track of all other traffic that attempts to enter a link. Here's a sample configuration:
Interface Serial 0/0
Access-group 100 in
access-list 100 remark Begin -- Allow BGP IN and OUT
access-list 100 permit tcp host 1.1.1.1 host 2.2.2.2 eq bgp
access-list 100 permit udp any host 2.2.2.2 gt 33000
access-list 100 remark End
access-list 100 deny ip any any log
All traffic will go to your Cisco router’s log if you have “logging buffered” turned on or to a syslog server if you configured one.
For the second example, let's say you are trying to nail down an access list to permit only the proper traffic to go over your dialup link. You use an access list and log the existing traffic to get an idea of what is being carried so that you can configure the correct access list. Here's a sample configuration:
Interface BRI 0/0
Access-group 100 in
Access-group 100 out
access-list 100 permit ip any any log
If you look at the output in the router’s log, you will see that an ICMP packet and a TCP packet went across your link:
02:03:43: %SEC-6-IPACCESSLOGDP: list 100 permitted icmp 1.1.1.2 -> 1.1.1.1 (0/0), 1 packet
02:06:25: %SEC-6-IPACCESSLOGP: list 100 permitted tcp 1.1.1.2(0) -> 1.1.1.1(0), 1 packet
1. Debug IP packet detail XXX (access list number)
My number-one debug technique is using an access list to see all the traffic going to and from some destination, just like a basic sniffer/protocol analyzer. The limitation to this one is that you can’t see the packet payload and can see almost nothing of the headers.
Since you can do this with an access list, you can nail it down to a particular host, protocol, port, or network range, as well as using a uni- or bi-directional access list. I know it isn’t a real protocol analyzer, but it could still come in handy—and it's already built into the IOS. The sample configuration below shows the logging of all Telnet packets to your router. (These could just as well be a host on one of your router’s networks.)
access-list 101 permit tcp any any eq telnet
debug ip packet detail 101
IP packet debugging is on (detailed) for access list 101
Listing Eshows the sample output of what the debug output would look like.
You can see from the output that you get the IP source, destination, interfaces, source and destination port numbers, sequence numbers, acknowledgement numbers, window sizes, and TCP communication flags (SYN, ACK, FIN).
Troubleshoot Cisco routers and switches using the debug commands - Part 3
What are the three most common mistakes made when using Debug?
Using Debug can be a risky proposition, and even experienced admins have made mistakes when using it.
I’d say the number one common mistake is to forget that you have left Debug on in a production environment. Sometimes, we get so focused on resolving the issue that when we get it resolved, we are on to the next “opportunity” and forget to issue the no debug command to turn off debugging. I think that many a network admin can attest to horror stories of when they brought their router to its knees because they forgot this simple task of turning off Debug.
The second common mistake would be not realizing the effect on your router of issuing a lot of Debug commands at the same time. Remember that the router’s job is to forward packets, not to monitor processes and generate Debug messages. For example, you are having a problem with the packets on your router, so you issue the Debug statement debug ip packet. Then you decide that you want to view the events on the RIP protocol. Now, you have two separate Debug statements that are being processed and sent to the console. Debug statements are processed at a higher priority than other network traffic, so, needless to say, these Debug statements can jeopardize your router’s performance.
The third common mistake made with the Debug command is entering debug all or debug ip packet detail on a production router. Either one of these commands can crash a heavily loaded production router. Luckily, there is an “are you sure” prompt before these take effect; however, that hasn’t prevented every debug-related catastrophe. You should be as specific as possible when using Debug, and then turn it off as quickly as possible. Also, always test your Debug commands on a test router before using them in a production environment.
Troubleshoot Cisco routers and switches using the debug commands - Part 2
Let’s take a look at a simple example. We are going to view RIP (Routing Information Protocol) in Debug mode.
Router# debug ip RIP
RIP protocol debugging is on
To verify what debugging is enabled, use this command:
Router# show debug
RIP protocol debugging is on
The output from whatever type of debug is enabled will be sent to wherever the Cisco IOS logging system tells that output to go. Either you will receive the output on your screen, it will go to the buffered log on the router, or it will go to a syslog server across the network (or all of these).
To see what level the various outputs are set to and where the output will go, type:
Router# show logging
Syslog logging: enabled (1 messages dropped, 3 messages rate-limited,
0 flushes, 0 overruns, xml disabled, filtering disabled)
Console logging: level debugging, 8 messages logged, xml disabled,
filtering disabled
Monitor logging: level debugging, 0 messages logged, xml disabled,
filtering disabled
Buffer logging: level warnings, 2 messages logged, xml disabled,
filtering disabled
Logging Exception size (4096 bytes)
Count and timestamp logging messages: disabled
Trap logging: level informational, 12 message lines logged
Log Buffer (51200 bytes):
*Jun 9 20:56:49.195: %LINK-3-UPDOWN: Interface FastEthernet0/0, changed state to up
*Jun 9 20:56:49.231: %LINK-3-UPDOWN: Interface FastEthernet0/1, changed state to up
Router#
The console should display RIP updates that are sent and received through the RIP protocol. Here is an example of what you might see for RIP debugging:
*Jun 9 21:13:56.471: RIP: sending v1 update to 255.255.255.255 via FastEthernet0/0 (1.1.1.1)
*Jun 9 21:13:56.471: RIP: build update entries - suppressing null update
*Jun 9 21:14:22.519: RIP: sending v1 update to 255.255.255.255 via FastEthernet0/0 (1.1.1.1)
*Jun 9 21:14:22.519: RIP: build update entries - suppressing null update
Remember that you should use Debug only for a short time to get a snippet of information, and then turn Debug off as it can be a serious performance hit on your router.
There are several commands for turning off Debug.
Router# no debug
If you type debug ?, you will see that there are over 200+ Debug commands, and each of those has many options. Debugging RIP is just a very simple example.
Troubleshoot Cisco routers and switches using the debug commands - Part 1
Often, you cannot solve router and switch issues with “show” commands alone. At some point, you will have to use Debug commands to find out what is really going on behind the scenes. In this article, you will learn about Cisco IOS Debug commands and how they can help you.
What makes Cisco IOS Debug commands so useful?
Cisco IOS Show commands can tell you many things about what is going on with your router or switch, but they can’t tell you everything. For example, Show commands cannot tell you when routes drop in or out of the routing table, why an ISDN line failed to connect, whether a packet really went out the router, or what ICMP error code was received. On the other hand, Cisco IOS Debug commands can tell you all these things, and more.
Besides providing more detailed information than what Show commands can provide, Debug commands have the benefit of providing information in “real time” (or dynamically). This is contrary to Show commands that just take a snapshot in time and display the results on your console (somewhat static results). This real-time difference can be very helpful in diagnosing problems.
Tuesday, October 7, 2008
How to learn CCNA efficiently?
Following is some comments on how to learn CCNA efficient. I think it is helpful.
1. I bought both Lammle's book, plus the Cisco PressICND1, and ICND2 books by Wendell Odom
I tend to recall commands and show output much better from hands-on than from the text. I may be wrong but it seems that way to me.
1. I bought both Lammle's book, plus the Cisco PressICND1, and ICND2 books by Wendell Odom
I like Odom's books and as there are two (smaller) ones, I can carry one and read on the train/plane. I prefer the style to Lammle's book, but I'm sure mileage varies.
You should also consider doing a CCNA course or bootcamp. I recently attende one. In the interest of fair disclosure, I work for Global Knowledge!
2. I think the best advice I can give you regarding the 640-802 is to subnet, subnet and then subnet some more. Only when you have a true grasp on the complexities of subnetting and general IP addressing schemes can you really begin to appreciate other topics.
The CISCO press books are a little dry but they are packed with the information required. I would probably then plump for a ExamCram volume as a reference point in the last few weeks before the exam. These books will not teach you the topics in any great depth but they can act as good benchmarks.
3. Lammlee's book is a good resource. I also used the Transender practice exams and purchased a couple of routers and switches off ebay to practice on. I was able to pass the ICND1 on the first attempt using only these resources. (I decided to go the two-exam route)
The ICND2 exam is a little tougher IMO. Make sure you understand spanning tree, OSPF, NAT/PAT.
4. Odom's (Cisco Press) ICND1 and ICND2 and both are excellent.
I used Odom's ICND1 to prepare for the 1st exam. I followed his study plan recommendations and did very well on the exam.
I'm using Odom's ICND2 now to prepare for next exam and my studies appear to be going well. Below is a summary of what I'm doing.
- I'm using both the ICND1 and ICND2 texts to prepare as if I'm studying for the composite (640-802) exam. I've found this helps me better understand topics covered in ICND2 text.
- After I read a topic in ICND2, I go back through the material and practice the commands and configurations on my home lab. I go over and over the 'show' commands used.
- I spend 3-4 hours a week getting more hands-on to drill in what I've covered to date.
I tend to recall commands and show output much better from hands-on than from the text. I may be wrong but it seems that way to me.
I purchased Lammle's text for the composite (640-802) exam thinking I would read it in conjunction with the Odom texts. Again, maybe it's just me, but that didn't work well for me. In fact, I pulled Lammle's text off the shelf tonight to read his section trunking, vtp, etc. I had already covered the material in Odom's text and I thought Lammle's would help me catch anything I missed. Didn't work. In fact, I stopped and put it back on the shelf because I didn't want it to confuse me. (It also appears to me that Lammle doesn't devote as much time as I need to some topics.)
5. There are a number of resources, Mirza - to some degree it depends on how you learn best.
I've posted above two sets of books (Lamie and Odom) that for me are very good. I guess these are a great starting point.
In addition to this, you might consider taking a training course. I'm biased because I work there, but take a look at Global Knowledge's classes (www.globalknowledge.com, or www.globalknowledge.net). Depending on how much you can do youself, consider the CCNA bootcamp vs the ICND1/ICND2 classes.
Getting some real hardware or a good simulator is also important. Boson's product looks pretty good, and there'a an open souce product (but that needs actual IOS images that may not be readily available to you). But picking up a couple of switches and a router should not be too expensive (ebay to the rescue).
Learn CCNA in 5 days
 Learn CCNA in 5 days | 24.85MB
The Cisco CCNA network associate certification validates the ability to install, configure, operate, and troubleshoot medium-size routed and switched networks, including implementation and verification of connections to remote sites in a WAN. This new curriculum includes basic mitigation of security threats, introduction to wireless networking concepts and terminology, and performance-based skills. This new curriculum also includes (but is not limited to) the use of these protocols: IP, Enhanced Interior Gateway Routing Protocol (EIGRP), Serial Line Interface Protocol Frame Relay, Routing Information Protocol Version 2 (RIPv2),VLANs, Ethernet, access control lists (ACLs)
Download:
Monday, October 6, 2008
Pass4Sure 640-802 v3.20
 Exam Number/Code: 640-802
Exam Name: Cisco Certified network Associate
“Cisco Certified Network Associate”, also known as 640-802 exam, is a Cisco certification.
Preparing for the 640-802 exam? Searching 640-802 Test Questions, 640-802 Practice Exam, 640-802 Dumps?
With the complete collection of questions and answers, Pass4sure has assembled to take you through 254 Q&As to your 640-802 Exam preparation. In the 640-802 exam resources, you will cover every field and category in CCNA helping to ready you for your successful Cisco Certification.
Go to our forum to download lastest version of Pass4Sure
http://www.youthgeneration.net/forum/index.php?topic=59.0
Note: This program run in Java JDK 1.6. You should upgrade your java to latest version JDK1.6
Setup Home Server
What do we need?
1. Modem ADSL + ADLS line ( Modem X5)
2. PC up-time 24/24
3. Windows XP + IIS Server
Step1:
Check LAN setting:
PC(192.168.0.9) <---> Router (IP=192.168.0.1) <--> Modem ADSL
IP Address : 192.168.0.9
Subnet Mask : 255.255.255.0
Default Gateway : 192.168.0.1 <--- IP of Modem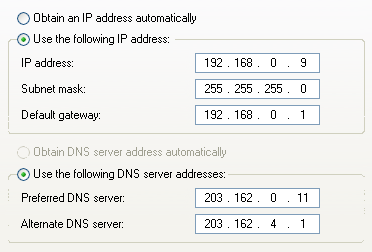
Step II: Config router
Enter router configuration web page: http://192.168.0.1
 Chose (Advandce Setup)
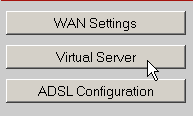 Chose Virtual Server
Step 3: Set NAT configuration.
Public Port : 80
People from internet will connect to this port in order to connect to home server. Router will redirect traffic from public port in router to our PC.
Private Port : 80 Port that our PC listen to
Port Type : TCP
Host IP Address : xxx.xxx.xxx.xxx (IP of our computer)
 Step 4: Save configuration and reboot.
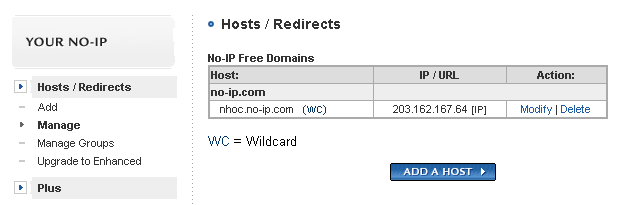
Step 5: Create domain which point to our IP
Because ADSL uses dynamic IP so we need an domain to update IP.
Use service: www.no-ip.com.
Create an account
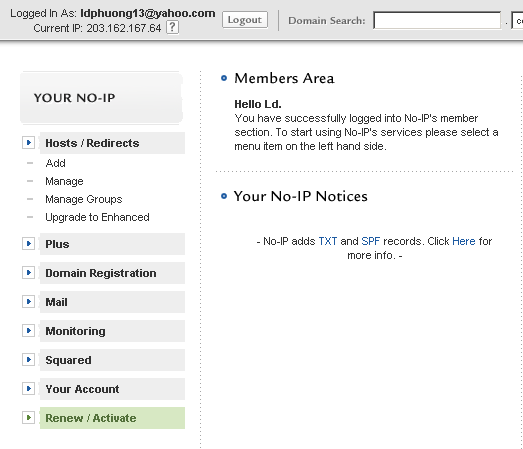
Add our host to domain
 Download: No-IP DUC to update IP periodically

1. Modem ADSL + ADLS line ( Modem X5)
2. PC up-time 24/24
3. Windows XP + IIS Server
Step1:
Check LAN setting:
PC(192.168.0.9) <---> Router (IP=192.168.0.1) <--> Modem ADSL
IP Address : 192.168.0.9
Subnet Mask : 255.255.255.0
Default Gateway : 192.168.0.1 <--- IP of Modem
Step II: Config router
Enter router configuration web page: http://192.168.0.1
Chose (Advandce Setup)Chose Virtual ServerStep 3: Set NAT configuration.
Public Port : 80
People from internet will connect to this port in order to connect to home server. Router will redirect traffic from public port in router to our PC.
Private Port : 80 Port that our PC listen to
Port Type : TCP
Host IP Address : xxx.xxx.xxx.xxx (IP of our computer)
Step 4: Save configuration and reboot.Step 5: Create domain which point to our IP
Because ADSL uses dynamic IP so we need an domain to update IP.
Use service: www.no-ip.com.
Create an account
Add our host to domain
Download: No-IP DUC to update IP periodically
Creating a Wireless Network -- Part 3 (Troubleshooting)
Step-by-Step: Creating a Wireless Network -- Part 3 (Troubleshooting)
By: Aaron Weiss
By: Aaron Weiss
August 10, 2006
In Part 2 of “Creating a Wireless Network" we set up and configured your wireless network, beaming data across your home and/or office. But sometimes, things go awry. What if your network seems to slow? Or unreliable? In the conclusion to our series we look at some common factors that can undermine your wireless network and how you might be able to improve its performance.
Weak Signal?
Whether you’ve set up an 802.11b network, a 11g network, or an enhanced network with speeds of 108Mbps or more, experiencing maximum speed depends on signal strength between your wireless router and your wireless computer.
Wireless networks are designed to slow down as the signal degrades, which generally is a good thing – it means your network isn’t simply on or off, but capable of working under a variety of less-than-ideal conditions. But if yours is slowing down unnecessarily, you may have options to improve its speed.
Your signal strength will vary depending upon your wireless computer’s location relative to your wireless router.

In Windows XP (screen above) you can double-click the wireless networking icon in your taskbar to see your signal strength.

Mac OS X users can click the AirPort icon in the toolbar an choose Open Internet Connect from the drop down menu to see a detailed signal strength meter (see screen above).
In practice, you may not see 100 percent signal strength, yet still achieve near maximum network speed. Wireless performance is divided into segments. If your connection seems to hover under 60 percent or so in strength, consider why that may be.
Wireless Router Placement
 Often, signal-strength problems are due to the location of your wireless router. Ideally, the more of a "bird's eye view" your wireless router has of your home or office, the stronger the signal will be throughout. Central, open locations on higher floors are ideal.
Of course, in practice, your wireless router needs access to power and, probably, your broadband modem. You may be able to relocate your broadband modem depending where your cable or phone lines enter your home or office, or extend the cabling between your broadband modem and router.
In particular, avoid placing your wireless router in basements or other locations surrounded by thick walls, which will weaken the wireless signal. The same rules apply to the other end of the connection, too — your wireless computer. Obviously, your distance from the router is one factor in signal strength, but within its rated operating range, distance is less important than dense physical obstacles.
Be sure that the antenna(s) on your wireless router are in an upright position. Usually this works best, but if you continue to experience signal strength weakness, try re-orienting the antennas by small amounts.
Unfortunately, all hardware is not created equal. Some models of wireless router simply perform better than others. And different models of wireless add-on cards and built-in wireless reception on portable computers can vary widely. It's not uncommon for one model of portable computer to receive a weaker signal strength than another model or brand right beside it due to lower quality components.
Interference
As our electronic universe becomes increasingly crowded, opportunities for one piece of gear to interfere with another increase. Today's wireless network hardware uses the 2.4GHz frequency range. Two of the most notorious culprits that also emit radiation at 2.4GHz are microwave ovens and many cordless telephones.
The mere presence of two operating devices at 2.4GHz does not automatically guarantee conflict. Wireless network gear slices up its frequency range into 11 smaller channels, and by default tries to find the clearest channel whenever a connection is made. Similarly, newer cordless phones are designed to be friendlier in co-existing with wireless networks. That said, proximity to microwave ovens (in use) and cordless telephones still account for the most common forms of interference with wireless networks.
Another common source of interference is other wireless networks. Again, the hardware tries to avoid conflict, but some handle this better than others, and densely populated areas may simply have crowded airwaves. If your home or office is located in an urban environment and your signal strength seems weaker than it should be, try moving your wireless gear to the center of your space. Staying away from walls or windows where neighboring networks might bleed through could help.
Dropped Connections?
Losing the connection between your wireless computer and your wireless router is the most common failure that can plague your wireless network experience. Sometimes you lose your connection and can't get it back for a random length of time. Other times, you lose your connection for a split second, but it's almost immediately re-established. Even this can cause problems during certain activities, like file transfers.
Dropped connections can be tricky to diagnose because they are really a symptom of another problem. Quite a few problems can express themselves as a lost connection. Let's consider some of the most common causes.
Interference
We talked about how interference can affect your wireless performance. If severe enough, interference could certainly result in dropped connections. I remember a case where an individual sat with his cordless phone right beside his portable computer. He'd be surfing the Web without difficulty and then the phone would ring. After their conversation, their wireless connection was lost. It would spontaneously return 30 seconds or so later. Indeed, the culprit was the cordless phone, an older model, which was blasting interference on the 2.4GHz frequency shared by the wireless network.
Switching to a 900MHz or 5.8GHz cordless phone will often the resolve the conflict. Newer 2.4GHz cordless phones that advertise themselves as "WiFi friendly" will also resolve the problem.
Firmware and Driver Updates
Both your wireless router and wireless card, whether an add-on or built-in to your computer, are driven by software "brains". The brains of your wireless router is known as firmware. The brains of your wireless card is known as a driver.
Manufacturers often update their firmwares and drivers to add features and fix bugs. When you remove your hardware from its box, the firmware and drivers included may already be slightly outdated. Many times, this isn't a problem, because the bugs that do exist are often obscure and affect only certain unusual situations. But you never know.
There is something to be said for the adage, "if it ain't broke, don't fix it." If your wireless network is performing up to your expectations, there's really no need to muck around with updating your firmware and drivers. But if you are having mysterious problems — particularly dropped connections —that's a different story.
Often, updating your firmware and drivers turns out to be just the fix to gaining a stable connection.
Most wireless routers let you update the firmware through the browser-based administration interface. The process involves just a few simple steps:
| 1. Visit the manufacturer's site for your wireless router. | |
| 2. Navigate to the Downloads area and find the firmware for your specific model of wireless router. 3. Download the firmware and save or unpack it onto your computer (follow the manufacturer's instructions). 4. Connect your computer to the router using a wired Ethernet cable, and disable your wireless connection. It's not safe to upgrade your router's firmware over a wireless connection. |  |
| 5. Open the administration page for your wireless router. Our example is from a ZyXEL brand X-550 router — yours may look different. | |
| 6. Open the firmware upgrade administration page and follow the prompts to open the firmware file you downloaded. 7. Once you begin the firmware upgrade process, do nothing. Any interruption in the process, from a lost connection to a power outage, could damage your router. Before doing this at all, be sure to check the manual for your particular model. Procedures may vary. |  |
More often than note, updating the wireless router firmware solves many mysterious network problems. But if it doesn't, the next suspects are the wireless drivers in your computer.
If possible, test other wireless computers in your network. Do they experience the same dropped connections as yours? If not, you may want to update the drivers of your wireless card. Procedures vary widely, so consult the Web site of your portable manufacturer, or the maker of your wireless card, for downloads and instructions to update your drivers.
Duplicate Network Names
Another scenario that may lead to dropped connections occurs when your wireless computer is confused about which wireless access point to connect with.
If your home or office is near others, they may have a wireless network with the same name as yours. This is especially common when people don't change their network names (known as SSID's) when setting up their router. In Part 2, Step 6 of this series we configured the network name.
Suppose you didn't change your wireless network name, so it defaults to the very common "LINKSYS". Your neighbor next door has the same brand of router and didn't change her network name either. If your wireless networks overlap, your computer can see both. Windows XP will not show both as separate available networks — instead, it will show only "LINKSYS."
When you connect to "LINKSYS" Windows will try to connect with the one with a stronger signal. It may be that both your signals are similar, but small fluctuations change which is stronger at any given moment. Windows will start hopping between them, trying to stay with the strongest, and dropping your connection with each transfer.
Assign your wireless network a unique name and avoid the duplicate SSID problem.
802.1X Authentication
 In Part 2 of this series, we looked in detail at securing your wireless network, either with WEP or, better, WPA or, better yet, WPA2. Some organizations employ another form of security, known as 802.1X. Unless you are inside a network that uses 802.1X (most likely no), you don't need Windows to attempt 802.1X authentication. When it does so, it may interrupt your connection.
You can disable 802.1X authentication in Windows XP by going into your Control Panel, Network, and opening the Properties page for your wireless connection.
Look for the property tab labeled Authentication — its exact location may vary.
Uncheck 802.1x authentication.
Step-by-Step: Creating a Wireless Network – Part 2
Step-by-Step: Creating a Wireless Network – Part 2
By Aaron Weiss
On the rear of a typical wireless router you’ll see several connections (from right to left in Figure 1):
Note that
In our case, we have a broadband connection of the DHCP variety, also known as "Dynamic IP" as you see in Figure 4.
It sounds simple, but note that the router reports that the wireless radio is on. Without that we would get nowhere. This particular router has a physical switch on the back to enable the wireless function. Other routers will include a checkbox in this administration interface for enabling or disabling all wireless function. Some wireless routers come out-of-the-box with their wireless disabled, others enabled. So it's important to double check.
Also note the 802.11 mode setting, typically found on "g" variety wireless routers. Here you can tell the wireless router to connect only to devices which support the faster "g" mode, only the slower "b" mode, or either kind of device. Supporting both modes will make your wireless network more compatible with a variety of users. But if you know that you have only "g" wireless hardware in your network, selecting g-only mode can improve overall wireless performance.
In most circumstances you should employ encryption to protect your wireless network from all manner of attack and interception. Wireless networks located far removed from other people, like rural locations, probably don't run much risk without using wireless security. But we're often better safe than sorry.
7b. Choose WPA2 encryption if supported by your wireless computers. Our particular router offers a mixed WPA mode which will connect to WPA2 where available or else try WPA. Your router may or may not offer this feature, in which case you may need to select WPA mode if your network users may use hardware which does not support WPA2.
With the above configurations saved you're now ready to put the "wireless" in "wireless network." Choose the computer you will use to make the wireless connection. If you'll use the same computer you've been using to configure your router with the temporary Ethernet cable, remove that cable now.
Both Mac OS X and Windows XP include built-in software for connecting your wireless computer to the wireless network. Windows users may also have installed software provided by the vendor of your wireless hardware which can be used instead of Windows' included software.
Windows will open a summary showing the wireless network you created on your router -- and any other wireless networks your hardware sees in the vicinity!
You should now be able to access the Internet, if your router is connected to broadband, and share resources among your computers the same as on a wired network.
By Aaron Weiss
August 7, 2006
In Part 1 of “Creating a Wireless Network” we considered which equipment you’d need to meet your goals for speed, range, and security. Gear in hand, let’s set up the hardware and walk through a few simple configuration steps to bring your wireless network to life.
For the purpose of this guide, let’s assume you have two pieces of wireless gear: a wireless broadband router and a portable computer with wireless capability. If your portable computer does not have built-in wireless, you may use either a wireless card or USB adapter as described in Part 1. In either case, follow the manufacturer’s instructions for installing the device drivers that came with the hardware.
Step 1: Get To Know Your Wireless Router
 |
| |
- A power input jack one.
- One or more wired Ethernet jacks (often labeled 1, 2, 3, 4) for computers on your network which don't have wireless ability.
- One Ethernet jack for your broadband connection, often labeled “WAN” or “Internet.”
- A reset button. On most routers you can depress this button for 30+ seconds to restore all configuration settings to their factory defaults.
Depending on the model, some wireless routers will also have a small switch on the back to physically enable or disable the wireless network. You should verify that this switch is set to "on" to use the wireless functionality.
Some costlier routers may also feature two Ethernet inputs for two incoming broadband connections, for users who have both cable and DSL, for example.
Step 2: Determine Your Broadband Type
If you are not connecting your wireless router to a broadband connection, and only intend to use wireless networking for your local network rather than connecting to the Internet, skip this section.
Most people will connect their wireless router to an incoming broadband service. You need to know how your broadband service lets you onto its network, information we'll use in Step 5 to configure your router. There are three common broadband connection methods:
- DHCP aka Dynamic IP : The most common type of broadband connection, especially for cable modem users. Basic network parameters are automatically assigned to your router by the broadband modem.
- PPPoE: An increasingly common connection type, especially for DSL users in some parts of the country. PPPoE requires you to supply a username and password to initiate your broadband connection, information which should have been provided to you when your broadband service was installed or purchased.
- Static IP: Less common for home residential users, somewhat more common for business broadband. Your broadband provider would have supplied you with a set of numeric addresses you need to connect to the network, as they are not assigned automatically.
If you don't know which of the above your broadband service uses, when we setup your router you can try DHCP, since it is fully automatic. Should that fail to connect, you may contact your broadband provider for details.
Step 3: Connect Your Router To a Wired PC For Initial Setup
 |
| |
Before you place the router in its ideal location, we will first set things up with a temporary wired connection to a computer. Either a desktop PC or portable computer with an Ethernet jack will do, although hooking up to a portable may require less climbing behind or under furniture.
3A. Your router probably included an Ethernet cable in the box. Use this or another Ethernet cable you have to connect the network jack on your computer to one of the local ports on the router – those labeled 1, 2, and so on. It doesn’t matter which, as long as you do not connect the cable to your router’s “WAN”/”Internet” port.
Also connect the Ethernet cable from your broadband modem to the "WAN"/"Internet" port on your router.
Now your router is connected via cable to both your broadband modem and your computer.
3B. It often helps to reboot your broadband modem at this point -- the easiest way is to unplug it from power and plug it back in. Most broadband modems will take a little while to reboot, anywhere from a few seconds to a couple of minutes.
Boot (or reboot) your computer as well.
Step 4: Open Web Browser and Connect to Wireless Router Administration Interface
You manage and configure your wireless router using a Web browser. To connect to your router you need to know its default IP address and connect your browser to http://routeripaddress. For example, if you own a Linksys brand wireless router, its default IP address is 192.168.1.1, and therefore you open your browser to the URL http://192.168.1.1.
Most wireless routers also require you to log in to access configuration pages. Quite likely, your router includes a manual or a "quick setup" guide which details both its default IP address and default login. Some common IP addresses and logins for popular brands include:
| Brand | Default Address | Default Username | Default Password |
| Belkin | 192.168.2.1 | ||
| D-Link | 192.168.0.1 | admin | |
| Linksys | 192.168.1.1 | admin | admin or |
| Netgear | 192.168.0.1 | admin | password |
| SMC | 192.168.2.1 | smcadmin | |
| Zyxel | 192.168.1.1 | admin or | 1234 |
 |
| |
Once connected, you'll see an administration interface similar to that in Figure 3, which was taken from a Zyxel brand wireless router. Your particular router's interface may look different and feature different menus, but many of the most important settings are similar between models and brands. Consult your documentation, of course.
Step 5: Configure Your Broadband Connection
You may recall way back in Step 2 you determined the type of broadband connection you have. Now it's time to setup the router accordingly. On this model, we clicked the "Basic" menu and "WAN" submenu. Again, your model may differ, and newer models may include a guided wizard that takes you through these steps. Users without a broadband connection can likewise skip this step.
 |
| |
PPPoE users should click that button and a prompt will request your login name and password, as supplied by your service provider.
Static IP users will be prompted to supply several numerical addresses, also supplied by your service provider.
It's important to click "Save Settings" (sometimes called "Apply Settings") whenever you make a change.
Test that your router is successfully connected to your broadband. One quick way is to simply open a page to a Web site, such running a search at Google.
If you cannot access the Web, the most common cause is choosing the wrong broadband connection type for your service.
Step 6: Configure Your Wireless Network Basics
If your router is connected to broadband and it's working successfully, we can (finally!) setup the wireless networking configuration. On our sample router we clicked the "Wireless" submenu.
 |
| |
Assign your wireless network a name, also known as an SSID. Choose a unique name in case there may be neighboring wireless routers nearby.
The visibility status setting is sometimes known on other routers as "hidden" mode. Some people mistakenly believe that hiding your network name is an effective form of security. It is not. You don't need to hide your network name.
 |
| |
Step 7: Configure Your Wireless Security
 |
| |
Most wireless network users will select one of three common forms of secure encryption: WEP, WPA, or WPA2. As a general rule of thumb, you should only use the older, less secure WEP security when you know your network must support users with only WEP-capable computers. WPA is stronger than WEP and supports a wide variety of computers. WPA2, the newest form of wireless security, is even stronger still, but supports only the newest wireless computers.
7a. If you must use WEP security, try to choose a key length of 128 bits. If your router or wireless computer do not support 128 bit keys, you can try 64 or 40-bit keys, but note that these are even less secure.
Supply a passphrase for your WEP encryption. Later you'll need to use this same passphrase when configuring WEP on your wireless computer connection. Typically you can leave the remaining WEP options unchanged.
 |
| |
Your "Pre-Shared Key" is your WPA password. It must be longer than 8 characters up to 63. A longer, more difficult to guess key provides stronger security, but you must write it down somewhere safe because all connecting computers must use this password key.
Step 8: Going Wireless
 |
| |
If your portable computer is a newer model and includes built-in wireless support, be sure its wireless feature is switched on. On some portable models there is a switch on one side; on other models you enable wireless with a keyboard combination -- check your user manual.
If you've added wireless hardware to a portable computer or a desktop PC, be sure to follow the manufacturer's instructions for installing the appropriate drivers and software. This process varies widely from model to model.
 |
| |
8a. Users of Mac OS X enjoy the easiest wireless connection process. Simply click the wireless icon at the top right of your screen and the drop down menu displays a list of available wireless networks. Choose one to join it. If you've secured your wireless network in Step 7, it will show a small lock beside its name, and the Mac will prompt you for the password key you created on the wireless router. (See Figure 9.)
8b. Windows users will see a wireless system icon in the lower right of the screen. You can right-click this icon to pop open a menu from which you select "View Available Wireless Networks." (See Figure 10.)
 |
| |
In Figure 11, Windows sees the one wireless network transmitted from our router. As indicated, it is protected with WPA security.
Click the "Connect" button and Windows will prompt for the password key you created in Step 7.
If you are using your wireless hardware vendor's software rather than Windows', it may look different -- for example, Netgear supplies their own connection software with some models. In Figure 12, we use Netgear's wireless connection software to connect to a 128-bit WEP-protected network.
Whatever wireless connection software you use, the end result should be the same: you're connected!
 |
| |
Your wireless network will perform best with a strong signal. Ideally, find a location for your wireless router which is far from dense obstructions. Where possible, locating your wireless router in a higher location (such as a second story) is preferred to a low location like a basement.
In part three we'll take a closer look at fine tuning your wireless network performance and troubleshooting connection problems.
Creating a Wireless Network - Part 1
It’s no secret by now that wireless networking is quickly replacing tangled messes of cables in many homes and small businesses. No more fishing wires through walls, no more tripping over wires laid across doorways, and no more yelling at Fido or Fluffy when think Ethernet cables are chew toys.
What people love most about wireless networking, though, is the freedom it offers to share files between a computer in your office and one in your lap out on the patio, or to surf the Internet from bed. But with that explosion comes an avalanche of choices and technologies that can quickly become overwhelming. The good news is that putting together a wireless network can be simple. The key is to assess your needs, acquire the right equipment, and proceed through a few basic steps.
Step 1: Determine Your Needs and Set Your Goals
Wireless networking equipment is not all created equal, in part because different users have different needs. Think of a wireless network as having three primary personality traits: speed, range and security. Depending on your situation, you may want a network with all three or you may need a network strong in only one or two.
Consider these hypothetical scenarios:
A typical city dweller. You simply want to surf the Web and check e-mail using your portable computer around your apartment in the city. In this scenario, neither speed nor range need be best in class, but security is important because you are close to neighbors whose computers could pick up your signal.
A typical country dweller. You also just browse Web sites and log in to e-mail but your house is large, you have lots of land, and your neighbors are spread far and wide. You want Internet access from the backyard so range is important, but you may not need the most speed or the strongest security.
A business. You may need it all – speed for moving large documents around your network quickly, good range for providing access to users spread throughout several rooms or floors, and strong security to lock down your communications and prevent sensitive information from being compromised.
As you might expect, there is some correlation between price and performance when it comes to wireless networking equipment. Although prices continue to fall, considering your needs first will not only help you choose the right gear, but perhaps save you some money in the process.
Step 2: Choose Your Speed
Faster is better, right? It can be, and more speed certainly can’t hurt. But, like pumping premium octane fuel into a budget car, buying more wireless speed may mean paying extra for something you don’t really need.
There are two official wireless technologies you will typically find walking into any major name electronics depot: 802.11b and 802.11g. Often these are simply referred to as “b” and “g” respectively.
Packaging for an 802.11g 54Mbps wireless router
Wireless “b” gear is rated to 11Mbps while “g” gear is rated to 54Mbps. You may see these figures promoted on the packaging.
Newer technology is being added to wireless equipment to support even higher speeds such as 108Mbps and, most recently, 300Mbps. But these premium-priced devices are not yet based on official standards, meaning they may be compatible only with specific models from the same vendor, and future compatibility is unknown.
Don’t Be Fooled By Marketing Claims:
- The top speed your wireless network will achieve is half the advertised speed rating. A “b” network tops out at 5.5Mbps, a “g” network at about 27Mbps, and so on. Your real world speeds may be even lower due to wireless interference.
- “Mbps” does not mean “megabytes per second” but rather “megabits per second.” In real world terms, 1Mbps equals approximately a 122 Kilobytes/sec data transfer rate.
- A faster wireless network will not necessarily improve your Internet experience. You will be able to share files between your own computers as fast as your wireless network will allow, but your Internet download speed is limited by your broadband service. Most broadband service available in the U.S. today ranges from 0.5-10Mbps, or faster in some exceptional cases.
Step 3: Know Your Range
A strong wireless signal will let you achieve the fastest speeds your wireless network supports. As the signal weakens due to interference or distance, your speed will slow down accordingly.
The typical advertised range for most wireless network gear is 300 feet. In practice you could achieve significantly less range depending where you use the equipment. Dense obstacles such as walls, steel and trees will reduce your range. Interference from certain cordless phones and microwave ovens can also affect wireless network performance.
Significant improvements in wireless range are now available with higher-priced MIMO technology, which is used in model names including XR, RangeMax, and RangeBooster. These devices use multiple antennas (some hidden inside) to achieve greater range but performance can be unreliable if you mix and match hardware from different vendors.
Step 4: Evaluate Your Security Needs
Wireless network security is a hot topic in the media and for good reason – too often people leave their networks vulnerable. Because wireless data is just that – wireless – there can be ample opportunity for outsiders to sneak onto your network. Their actions may be harmless if they simply ride your Internet connection to check their e-mail, or they could attempt to steal passwords and other sensitive data.
Later we’ll setup wireless security, but first you need to decide how strong your hardware needs to be. The best forms of security rely on encryption so that if someone does intercept your data, they can’t make heads or tails of it. But some encryption is better than others – there are four degrees of encryption security available in wireless hardware today:
1. WEP: The oldest and least secure data encryption. All wireless gear supports WEP, though, so it’s useful when you need at least some kind of encryption to be compatible with older wireless hardware.
2. WPA: A more secure upgrade to WEP. Designed so that many older devices which included only WEP can be upgraded to support WPA.
3. WPA2: A significantly more secure upgrade to either WEP or WPA. Cannot upgrade older hardware to WPA2, but many new wireless devices support WPA2.
4. VPN: Short for “Virtual Private Networking,” this technology is not specifically a form of wireless network security. But you can use VPN on your wireless technology if you want the highest form of security possible. Wireless routers with VPN technology tend to be among the more expensive options.
Typically you’d use WPA (or WEP as a last resort) when your wireless security needs to be compatible with users who may have older wireless hardware. WPA2 support is the best choice when buying all-new wireless hardware, and VPN is more often found in high-security business environments.
Step 5: Choose Your Hardware
It takes two to tango, not only on the dance floor, but with your wireless network. Any wireless network is comprised of at least two devices: a wireless access point, which transmits the signal, and a client (your portable or other computer), which receives the signal.
5a. Wireless Access Point
A wireless broadband routerThe wireless access point transmits the networking data your computers will receive. These days, most wireless access points are actually built-in to "wireless broadband routers," devices that let you share a high-speed Internet connection among several computers and provide security defense. Readily available at major electronics retailers, you can easily identify a broadband router with a wireless access point because it has at least one antenna, although some have two or more.
Some broadband providers, such as Verizon, may include a wireless router with your service — so you might already have one. If not, current prices for routers with wireless access points range from as low as $25 to as high as several hundred depending on features, particularly the big three: speed, range, and security.
5b. Wireless Client
The wireless client is hardware, which “sees” the wireless networking data being transmitted by your access point. Most new portable computers include wireless client hardware already built-in. If you have an older portable computer without wireless support, or a desktop PC, you can add wireless client hardware. You have three choices:
A wireless card (for portable computers). Wireless cards look like credit cards, but slightly larger, often with a bump on one end. These slide into one of the card slots often found on the side of your portable computer. Wireless client card for portable computer
A USB peripheral. USB wireless clients come in a few shapes and sizes. One is a small box with a cable that plugs into one of your USB ports. Another is a “stick” shape which simply protrudes from a USB port. You can use a USB wireless client with most portable or desktop PC’s. Portable computer owners often prefer wireless cards instead because they slip almost completely into the machine. For desktop PC’s, a USB wireless client is the easiest solution to install. USB Wireless client"Stick" style USB wireless client
A PCI card (for desktop PC’s). A PCI wireless client is a circuit board that is installed inside your desktop PC. It will probably have a small antenna that sticks up outside your PC case. Some PC owners prefer a PCI wireless client for its “cleaner” installed look, and a wider range of models with different price/feature points than USB devices. However, installing a PCI card requires some work inside the PC case or else paying extra and hauling your PC to the electronics store. PCI wireless client card
For maximum performance you should choose a wireless router and client which support the same technologies. For example, if you want a “g” network, both devices must support the “g” standard. If you want special non-standard features such as support for 108 or 300Mbps speed and MIMO extended range, consider buying all wireless hardware from the same manufacturer.
In our next installment we set up your new wireless equipment, configure as needed, and fire it up!
Friday, October 3, 2008
Minimizing Windows network services - Win 2000 and XP
Jean-Baptiste Marchand
----[ Introduction ]----
A default Windows system comes with different network services, enabled by
default. Usually, it is wise to disable most of them and even all of them,
if the system does not offer network services to other systems.
In this document, we give a possible methodology to complete this task.
Technical details are described in a separate document entitled
_Windows network services internals_ and available at
http://www.hsc.fr/ressources/articles/win_net_srv/ .
The _Windows network services for Samba folks_ presentation, available at
http://www.hsc.fr/ressources/presentations/sambaxp2003/ , describes some
internals of Windows core network services.
Systems used as examples are Windows 2000 (server version) and Windows XP, as
installed by default (DHCP was disabled and IPv4 address 192.70.106.143 was
assigned to the unique network interface). Of course, the best solution is to
choose only required services at installation, even if it does not exempt you
from all the setup described here.
----[ Services identification ]----
A quick way to identify running network services is to list opened TCP and UDP
ports with the netstat command.
On a Windows 2000 system, the netstat -an command returns:
C:\WINNT>netstat -an
Active Connections
Proto Local Address Foreign Address State
TCP 0.0.0.0:25 0.0.0.0:0 LISTENING
TCP 0.0.0.0:80 0.0.0.0:0 LISTENING
TCP 0.0.0.0:135 0.0.0.0:0 LISTENING
TCP 0.0.0.0:443 0.0.0.0:0 LISTENING
TCP 0.0.0.0:445 0.0.0.0:0 LISTENING
TCP 0.0.0.0:1025 0.0.0.0:0 LISTENING
TCP 0.0.0.0:1026 0.0.0.0:0 LISTENING
TCP 0.0.0.0:1027 0.0.0.0:0 LISTENING
TCP 0.0.0.0:3372 0.0.0.0:0 LISTENING
TCP 0.0.0.0:4983 0.0.0.0:0 LISTENING
TCP 192.70.106.143:139 0.0.0.0:0 LISTENING
UDP 0.0.0.0:135 *:*
UDP 0.0.0.0:445 *:*
UDP 0.0.0.0:1028 *:*
UDP 0.0.0.0:1029 *:*
UDP 0.0.0.0:3456 *:*
UDP 192.70.106.143:137 *:*
UDP 192.70.106.143:138 *:*
UDP 192.70.106.143:500 *:*
On a Windows XP system, the netstat -ano command returns:
C:\WINDOWS>netstat -ano
Active Connections
Proto Local Address Foreign Address State PID
TCP 0.0.0.0:135 0.0.0.0:0 LISTENING 884
TCP 0.0.0.0:445 0.0.0.0:0 LISTENING 4
TCP 0.0.0.0:1025 0.0.0.0:0 LISTENING 976
TCP 0.0.0.0:5000 0.0.0.0:0 LISTENING 1160
TCP 192.70.106.143:139 0.0.0.0:0 LISTENING 4
UDP 0.0.0.0:135 *:* 884
UDP 0.0.0.0:445 *:* 4
UDP 0.0.0.0:500 *:* 704
UDP 0.0.0.0:1026 *:* 1112
UDP 0.0.0.0:1027 *:* 976
UDP 127.0.0.1:123 *:* 976
UDP 127.0.0.1:1900 *:* 1160
UDP 192.70.106.143:123 *:* 976
UDP 192.70.106.143:137 *:* 4
UDP 192.70.106.143:138 *:* 4
UDP 192.70.106.143:1900 *:* 1160
_Warning_:
The netstat command does not exactly report TCP and UDP ports states. Instead,
it reports state of TDI transport addresses and connection endpoints, whereas
only TDI connection endpoints represent TCP or UDP sockets.
In particular, when a Windows system establishes an outgoing TCP connection
(active open), the local port used as source is reported as in the LISTENING
state.
In the following example, the local system has established a TCP connection from
source port 1367 to destination port 22 of a remote system.
The netstat command output, filtered to show only lines containing port number
1367 is:
C:\WINDOWS>netstat -anp tcp | find ":1367"
TCP 0.0.0.0:1367 0.0.0.0:0 LISTENING
TCP 192.70.106.142:1367 192.70.106.76:22 ESTABLISHED
The second line shows the established connection, from local port 1367 to remote
port 22. However, the first line is incorrect because it reports local port 1367
in the LISTENING state, whereas no TCP server is available on this port.
Thus, for each outgoing TCP connection, an additional line will appear in
netstat output, showing a TCP port in LISTENING state. It is important to make
the difference between an opened TCP port and one incorrectly reported by netstat
in the LISTENING state.
Note: this bug has been fixed in Windows Server 2003.
Once opened ports are identified, we present recipes to get them closed, step
by step.
----[ Disabling unused services ]----
To minimize opened ports, the first thing to do is to disable services. In our
examples, we will stop services (using the net stop command). However, to
prevent a service from starting at next system restart, startup mode of service must
either be set to manual or disabled. Some services have to be explicitly
disabled, otherwise they will be manually started by the system.
On Windows 2000, the service manager allows modification of startup type of a
service.
C:\WINDOWS>services.msc
The Startup Type (Automatic, Manual or Disabled) can be set under the General
tab of the Properties of each service.
On Windows XP, the sc command (also available in Windows 2000 Resource
Kit) can change the startup type of a service, with such a command:
C:\WINDOWS>sc config service_name start= disabled
(space between start= and disabled is mandatory).
The following command
C:\WINDOWS>sc config service_name start= manual
configures the startup mode of a service to manual.
--[ Windows 2000 ]--
-[ IIS 5 ]-
On Windows 2000, IIS 5 runs by default and is composed of SMTP, HTTP and IIS
administration services. To close TCP ports 25, 80, 443, UDP port 3456, one
port used by IIS administration website (4983 in our example) and two
ports, higher than 1023 for RPC services, these services must be stopped.
The quickest way to stop these services is to stop the iisadmin service (other
services depend on it):
C:\WINNT>net stop iisadmin
The following services are dependent on the IIS Admin Service service.
Stopping the IIS Admin Service service will also stop these services.
World Wide Web Publishing Service
Simple Mail Transport Protocol (SMTP)
Do you want to continue this operation? (Y/N) [N]: y
The World Wide Web Publishing Service service is stopping.
The World Wide Web Publishing Service service was stopped successfully.
The Simple Mail Transport Protocol (SMTP) service is stopping.
The Simple Mail Transport Protocol (SMTP) service was stopped successfully.
...
The IIS Admin Service service was stopped successfully.
Output of the netstat -an command shows that the number of opened ports has been
reduced:
C:\WINNT>netstat -an
Active Connections
Proto Local Address Foreign Address State
TCP 0.0.0.0:135 0.0.0.0:0 LISTENING
TCP 0.0.0.0:445 0.0.0.0:0 LISTENING
TCP 0.0.0.0:1025 0.0.0.0:0 LISTENING
TCP 0.0.0.0:1026 0.0.0.0:0 LISTENING
TCP 0.0.0.0:3372 0.0.0.0:0 LISTENING
TCP 192.70.106.143:139 0.0.0.0:0 LISTENING
UDP 0.0.0.0:135 *:*
UDP 0.0.0.0:445 *:*
UDP 0.0.0.0:1029 *:*
UDP 192.70.106.143:137 *:*
UDP 192.70.106.143:138 *:*
UDP 192.70.106.143:500 *:*
Finally, the easiest way to prevent IIS services to start next time is by
removing IIS components, via Add/Remove Programs in configuration panel.
-[ IPsec ]-
UDP port 500, used by IKE protocol (Internet Key Exchange) can be closed by
stopping IPsec services service.
C:\WINNT>net stop policyagent
The IPSEC Services service is stopping.
The IPSEC Services service was stopped successfully.
UDP port 500 then disappears from netstat -an output:
C:\WINNT>netstat -an
Active Connections
Proto Local Address Foreign Address State
TCP 0.0.0.0:135 0.0.0.0:0 LISTENING
TCP 0.0.0.0:445 0.0.0.0:0 LISTENING
TCP 0.0.0.0:1025 0.0.0.0:0 LISTENING
TCP 0.0.0.0:1026 0.0.0.0:0 LISTENING
TCP 0.0.0.0:3372 0.0.0.0:0 LISTENING
TCP 192.70.106.143:139 0.0.0.0:0 LISTENING
UDP 0.0.0.0:135 *:*
UDP 0.0.0.0:445 *:*
UDP 0.0.0.0:1029 *:*
UDP 192.70.106.143:137 *:*
UDP 192.70.106.143:138 *:*
-[ Distributed Transaction Coordinator ]-
Distributed Transaction Coordinator service is enabled by default on a Windows
2000 server and opens TCP port 3372, and one TCP port higher than 1023 (1025 in
our example).
Stopping this service closes two TCP ports:
C:\WINNT>net stop msdtc
The Distributed Transaction Coordinator service is stopping.
The Distributed Transaction Coordinator service was stopped successfully.
List of opened ports is now:
C:\WINNT>netstat -an
Active Connections
Proto Local Address Foreign Address State
TCP 0.0.0.0:135 0.0.0.0:0 LISTENING
TCP 0.0.0.0:445 0.0.0.0:0 LISTENING
TCP 0.0.0.0:1026 0.0.0.0:0 LISTENING
TCP 192.70.106.143:139 0.0.0.0:0 LISTENING
UDP 0.0.0.0:135 *:*
UDP 0.0.0.0:445 *:*
UDP 0.0.0.0:1029 *:*
UDP 192.70.106.143:137 *:*
UDP 192.70.106.143:138 *:*
--[ Windows XP ]--
Services that can easily be disabled are:
IPsec services (PolicyAgent)
SSDP Discovery Service (SSDPSRV)
Windows Time (W32Time)
The following commands stop these services:
C:\WINDOWS>net stop policyagent
The IPSEC Services service is stopping.
The IPSEC Services service was stopped successfully.
C:\>WINDOWS>net stop ssdpsrv
The SSDP Discovery Service service is stopping.
The SSDP Discovery Service service was stopped successfully.
C:\>WINDOWS>net stop w32time
The Windows Time service is stopping.
The Windows Time service was stopped successfully.
netstat -ano command shows that the number of opened ports has been reduced (TCP
ports 5000 and UDP 123, 500 and 1900 have been closed):
C:\WINDOWS>netstat -ano
Active Connections
Proto Local Address Foreign Address State PID
TCP 0.0.0.0:135 0.0.0.0:0 LISTENING 884
TCP 0.0.0.0:445 0.0.0.0:0 LISTENING 4
TCP 0.0.0.0:1025 0.0.0.0:0 LISTENING 976
TCP 192.70.106.143:139 0.0.0.0:0 LISTENING 4
UDP 0.0.0.0:135 *:* 884
UDP 0.0.0.0:445 *:* 4
UDP 0.0.0.0:1026 *:* 1112
UDP 0.0.0.0:1027 *:* 976
UDP 192.70.106.143:137 *:* 4
UDP 192.70.106.143:138 *:* 4
---[ NetBIOS over TCP/IP (NetBT) ]---
NetBIOS over TCP/IP is typically used on Windows systems to transport the CIFS
protocol (also known as SMB). CIFS is the protocol behind resources sharing
(typically, file and printer sharing).
NetBIOS over TCP/IP uses UDP ports 137, 138 and TCP port 139. To close
these ports, NetBIOS over TCP/IP must be disabled on each network adapter.
For each network adapter in the Network and Dial-up Connection, select
Properties and choose Properties of Internet Protocol (TCP/IP). Click on
the Advanced button, select the WINS tab and check Disable NetBIOS over TCP/IP.
This will close UDP ports 137 and 138 and TCP port 139 on configured adapter.
The lmhosts service, used for NetBIOS name resolution can also be stopped and
disabled:
C:\WINNT>net stop lmhosts
The TCP/IP NetBIOS Helper service is stopping.
The TCP/IP NetBIOS Helper service was stopped successfully.
On Windows 2000, the list of opened ports becomes:
C:\WINNT>netstat -an
Active Connections
Proto Local Address Foreign Address State
TCP 0.0.0.0:135 0.0.0.0:0 LISTENING
TCP 0.0.0.0:445 0.0.0.0:0 LISTENING
TCP 0.0.0.0:1026 0.0.0.0:0 LISTENING
UDP 0.0.0.0:135 *:*
UDP 0.0.0.0:445 *:*
UDP 0.0.0.0:1029 *:*
On Windows XP:
C:\WINDOWS>netstat -ano
Active Connections
Proto Local Address Foreign Address State PID
TCP 0.0.0.0:135 0.0.0.0:0 LISTENING 884
TCP 0.0.0.0:445 0.0.0.0:0 LISTENING 4
TCP 0.0.0.0:1025 0.0.0.0:0 LISTENING 976
UDP 0.0.0.0:135 *:* 884
UDP 0.0.0.0:445 *:* 4
UDP 0.0.0.0:1026 *:* 1112
UDP 0.0.0.0:1027 *:* 976
---[ CIFS over TCP ]---
Before Windows 2000, the CIFS protocol was typically transported in NetBIOS over
TCP/IP (NetBT), using TCP port 139. Starting with Windows 2000, CIFS can be
transported directly in TCP/IP, without an intermediary NetBT layer. In that
case, TCP port 445 is used (see http://www.ubiqx.org/cifs/SMB.html#SMB.1.2
for more information).
To disable listening on TCP port 445, two methods are possible:
1. disable the NetBT driver
2. add a value in the registry to disable transport of CIFS in TCP
-[ Disabling the NetBT driver ]-
The first method completely disables SMB on a system, i.e both client-side
(workstation service) and server-side (server service).
You first need to stop the workstation and server services (and all services
that depend on them and may still run):
C:\WINNT>net stop rdr
The Workstation service is stopping.
The Workstation service was stopped successfully.
C:\WINNT>net stop srv
The Server service is stopping.
The Server service was stopped successfully.
Once these services are stopped, the NetBT driver can be stopped:
C:\WINNT>net stop netbt
The NetBios over Tcipip service is stopping.
The NetBios over Tcipip service was stopped successfully.
To disable the NetBT driver, the following registry value must be changed:
Key: HKEY_LOCAL_MACHINE\SYSTEM\CurrentControlSet\Services\NetBT\
Value: Start
Type: DWORD value (REG_DWORD)
Content: 4
On Windows XP, you can use the following command:
C:\WINDOWS>sc config netbt start= disabled
-[ Disabling the raw SMB transport without disabling NetBT transport ]-
In some cases, you might want to run the NetBT driver without using the raw SMB
transport, which uses TCP port 445.
In that case, you can set the following registry value:
Key: HKEY_LOCAL_MACHINE\SYSTEM\CurrentControlSet\Services\NetBT\Parameters
Value: SmbDeviceEnabled
Type: DWORD value (REG_DWORD)
Content: 0 (to disable)
After a reboot, TCP port 445 will no longer be opened by the NetBT driver.
The following ports remain opened on Windows 2000:
C:\WINNT>netstat -an
Active Connections
Proto Local Address Foreign Address State
TCP 0.0.0.0:135 0.0.0.0:0 LISTENING
TCP 0.0.0.0:1026 0.0.0.0:0 LISTENING
UDP 0.0.0.0:135 *:*
UDP 0.0.0.0:1029 *:*
Under Windows XP:
C:\WINDOWS>netstat -ano
Active Connections
Proto Local Address Foreign Address State PID
TCP 0.0.0.0:135 0.0.0.0:0 LISTENING 884
TCP 0.0.0.0:1025 0.0.0.0:0 LISTENING 976
UDP 0.0.0.0:135 *:* 884
UDP 0.0.0.0:1026 *:* 1112
UDP 0.0.0.0:1027 *:* 976
---[ RPC services ]---
Remaining ports are used by RPC services (Remote Procedure Call). The RPC
portmapper and the COM service control manager (COM SCM) both use port 135.
Ports immediately higher than 1023 are used by RPC services and are reachable
via RPC or DCOM (ORPC). As these ports are dynamically allocated, a port mapping
service is needed, the portmapper, to give the port on which a given RPC service
can be reached.
If you want to identify which RPC services is using which TCP or UDP port on
your own system, you can use the rpcdump tool to obtain the list of registered
RPC services in the portmapper database
(http://razor.bindview.com/tools/desc/rpctools1.0-readme.html ).
-[ Windows 2000 ]-
With rpcdump, we can determine that, on our test system, UDP port 1029 is used
by RPC services started by the Messenger service. After disabling this service
(as explained in the Disabling unused services section) and rebooting the
system, this port will be closed.
Also, UDP port 135 will no longer be opened because:
- the last RPC service reachable via UDP has been disabled
- DCOM is not reachable via UDP by default, thus the COM SCM does not listen
on UDP port 135.
TCP port 1026 is used by RPC services started by the Task Scheduler service
(Schedule). It is thus possible to close this port after disabling this service
and rebooting.
Remote Access Connection Manager (RasMan) must also be disabled.
-[ Windows XP ]-
On our Windows XP system, UDP port 1027 is used by RPC services started by the
Messenger service. As in Windows 2000, this port and UDP port 135 will no longer
be opened after disabling this service and rebooting.
TCP port 1025 is used by RPC services of the Task Scheduler service. Again, as
in Windows 2000, this service must be disabled.
--[ Interfaces restriction on Windows 2000 ]--
_Warning_: the interfaces restriction technique described here currently only
works on Windows 2000 (i.e, not on Windows XP).
Until now, we have disabled services that start RPC services, in order to close
the dynamic ports they use. However, sometimes some services such as the Task
Scheduler are needed.
It is possible to restrict listening network interfaces for some RPC services,
more precisely, for those services that do not explicitly listen on all network
interfaces.
A registry value allows the system to configure the list of network interfaces
on which RPC services will listen. The value contains a list of integers that
correspond to network interfaces indexes.
Before Windows 2000, this value contained network devices names, as described in
the 'Configuring the Windows XP/2000/NT Registry Port Allocations and Selective
Bindings' entry in Microsoft Platform SDK documentation, available somewhere at
http://msdn.microsoft.com/ . Starting with Windows 2000, the systems expects
network interfaces indexes, starting at 1.
The two following keys, Rpc\ and Rpc\Linkage\, do not exist by default in the
registry and must be created under the following key:
Key: HKEY_LOCAL_MACHINE\SYSTEM\CurrentControlSet\Services\
The value to add is:
Key: HKEY_LOCAL_MACHINE\SYSTEM\CurrentControlSet\Services\Rpc\Linkage\
Value: Bind
Type: REG_MULTISZ
Content: list of network interfaces indexes
Microsoft released on 4/16/2003 a new version of the rpccfg tool, that can list
network interface indexes and configure interfaces restriction. This tool is
available at http://download.microsoft.com/ (search keyword: rpccfg).
The -q option of rpccfg gives the current settings of interfaces and ports
restrictions:
C:\>WINNT>rpccfg -q
RPCCFG: Listening on all interfaces (default configuration)
RPCCFG: Using default port settings
The -l option of rpccfg gives the mapping between network adapters and
interfaces indexes:
C:\WINNT>rpccfg -l
IF[2]: Ethernet: 3Com EtherLink PCI (Microsoft's Packet Scheduler)
IF[1]: Ethernet: MS TCP Loopback interface
On our system, the first index corresponds to the loopback interface (IPv4
address 127.0.0.1). Thus, to restrict RPC service to the loopback interface, we
use the -a option with 1 as argument:
C:\WINNT>rpccfg -a 1
RPCCFG: Listening on the following interfaces
IF[1]: Ethernet: MS TCP Loopback interface
We can verify with the -q option that the interface restriction is correctly
configured:
C:\WINNT>rpccfg -q
RPCCFG: Listening on the following interfaces
IF[1]: Ethernet: MS TCP Loopback interface
RPCCFG: Using default port settings
-[ The case of the portmapper ]-
By default, the portmapper RPC service binds to all network interfaces.
A registry value, ListenOnInternet, controls whether the portmapper RPC service
binds to all interfaces or not. By default, this value does not exist and has
implicitly a default value of "Y":
Key: HKEY_LOCAL_MACHINE\SYSTEM\CurrentControlSet\Services\RpcSs\
Value: ListenOnInternet
Type: REG_SZ
Content: "Y" or "N"
When set to "N", TCP port 135 will only listen on interfaces specified by the
Bind value described in the previous section.
-[ Limits of the interfaces restriction technique ]-
The interfaces restriction technique has some limitations:
- it only works for RPC services that do not explicitly listen on all interfaces.
- it is a global setting, i.e. restrictions can not be implemented on a per-RPC
service basis.
- it seems to work only for TCP transport of RPC services
Tests have shown that the interfaces restriction technique works on Windows 2000
for the TCP transport of the following services:
RPC service of the Distributed Transaction Coordinator service
RPC service of the Task Scheduler service
RPC service of the inetinfo service
It does not work with the UDP transport of the following services (in fact, it
probably does not work with UDP transport at all):
RPC service of the messenger service
RPC service of the inetinfo service
-[ RPC dynamic ports range restriction ]-
By default, TCP and UDP ports for RPC services are allocated in the dynamic
ports range, which starts at 1025 (port 1024 does not seem to be used on Windows
systems). This explains why most of the RPC services lauched at startup listen
on TCP and UDP ports immediately higher than 1023.
It is possible to configure a specific range for ports allocated to RPC
services. This is typically used to ease ports filtering on IP filtering
devices. It can also be used to make a clear distinction between dynamic ports
(typically used when the system is a TCP or UDP client) and ports allocated to
RPC services.
The -pi and -pe option of rpccfg allows to configure the range of ports
allocated to RPC services. To set the range to 4000-4100:
C:\WINNT>rpccfg -pi 4000-4100
The following ports/port ranges will be used for Intranet ports
4000-4100
Default port allocation is from Intranet ports
We can finally verify that our networks interfaces and ports restrictions are
correct:
C:\WINNT>rpccfg -q
RPCCFG: Listening on the following interfaces
IF[1]: Ethernet: MS TCP Loopback interface
The following ports/port ranges will be used for Intranet ports
4000-4100
Default port allocation is from Intranet ports
--[ DCOM ]--
The only remaining opened port is TCP port 135. It is opened by the Remote
Procedure Call (RpcSs) service and it is not possible to disable it because this
service contains the COM service control manager, used by local processes.
TCP port 135 remains opened because it is used to receive remote activation
requests of COM objects. A global setting exists to disable DCOM and can be set
in the registry:
Key: HKEY_LOCAL_MACHINE\SOFTWARE\Microsoft\Ole
Value: EnableDCOM
Type: REG_SZ
Content: "Y" (to enable) or "N" (to disable)
This registry value corresponds to the 'Enable Distributed COM on this computer'
setting that appears in the dcomcnfg tool:
C:\WINDOWS>dcomcnfg
This procedure is now documented in the #825750 Microsoft knowledge base
article (http://support.microsoft.com/?id=825750 ).
Disabling DCOM is probably a good idea, as it will at least protect systems from
the recent vulnerabilities affecting DCOM, discovered by the Last Stage of
Delirium Research Group (http://www.lsd-pl.net/special.html ) and by the
Xfocus team (http://www.xfocus.org/advisories/200307/4.html ).
When DCOM is disabled, the COM framework returns the E_ACCESSDENIED error code
(0x80700005) when receiving remote activation requests. Thus, exploitation of
the aforementionned vulnerabilities fail.
Disabling DCOM does not close TCP port 135. To close it, one solution
is to remove IP-based RPC protocols sequences from the list that can be used by
DCOM. In our case, the sequence ncacn_ip_tcp (transport on TCP/IP) can be
removed.
The simplest solution for this is to use the dcomcnfg tool and to remove
'Connection-oriented TCP/IP' in the 'Default Protocols' tab.
Under Windows 2000, dcomcnfg directly shows the DCOM properties of the local
system, in particular, the 'Default Protocols' tab. Under Windows XP, dcomcnfg
launches an MMC console showing three nodes. The 'Default Protocols' tab appears
in the properties of the My Computer node, under the Computer node.
The list shown in the 'Default Protocols' tab is stored in the registry, under
the following value:
Key: HKEY_LOCAL_MACHINE\SOFTWARE\Microsoft\Rpc
Value: DCOM Protocols
Type: REG_MULTI_SZ
Thus, it is also possible to directly edit the registry and remove ncacn_ip_tcp
from the DCOM Protocols value.
After a reboot, all ports should be reported as closed, except one UDP port on
Windows XP, which we study in the next section.
--[ caching DNS service (Windows XP) ]--
Starting with Windows 2000, Windows systems include a caching DNS service
(dnscache), that keeps in memory results of DNS requests.
On Windows 2000, this service sends DNS requests on UDP, using a different UDP
source port for each request. On Windows XP, the same port is always used: it is
allocated at the first DNS request and remains the same, as long as the dnscache
service is running.
On our Windows XP system, the port used by the dnscache service is UDP port
1026. If we stop the dnscache service, this port will be closed.
It is possible to disable the socket caching mechanism used by the Windows XP
dnscache service, adding a registry value under the service key:
Key: HKEY_LOCAL_MACHINE\SYSTEM\CurrentControlSet\Services\Dnscache\Parameters\
Value: MaxCachedSockets
Type: REG_DWORD
Content: 0
With this setting, the Windows XP dnscache service will behave as under Windows
2000, i.e, different UDP sockets are used for each DNS requests.
--[ RPC services started when using the system ]--
Some RPC services can be started when starting some programs. For instance,
using the Component Services component under Windows XP seems to open two TCP
ports, used by RPC services.
Thus, it is always useful to use IP filtering, in addition to minimization
techniques presented here.
----[ Summary ]----
Minimization of network services can be realized in three steps:
- disabling of unused services
- disabling of NetBIOS over TCP/IP and CIFS over TCP
- minimization of RPC services
Services to disable are:
Windows 2000:
- IIS 5: iisadmin, w3svc, smtpsvc
- Others: messenger, msdtc, policyagent, schedule
Windows XP:
- messenger, policyagent, schedule, ssdpsrv, w32time
Disabling of NetBIOS over TCP/IP is specific to each network interface. To
globally disable CIFS over TCP (port 445), the SmbDeviceEnabled registry value
must be added and set to 0 in the registry.
Minimization of RPC services starts by disabling services that register RPC
services.
The removal of the 'Connection-oriented TCP/IP' protocol sequence in the dcomcnfg
utility allows to close TCP port 135.
If necessary, listening interfaces restriction can be configured for some RPC
services on Windows 2000, using the rpccfg tool.
----[ Conclusion ]----
A default installation of a Windows system has many network services. It is
possible and wise to minimize them, leaving only services that are strictly
necessary.
----[ Greetings ]----
Thanks to Jacqueline J. for proofreading this document and suggesting many
improvements.
Subscribe to:
Posts (Atom)


